Ionic Meetup
#22 Tokyo

新宿駅徒歩圏内の好立地での開催。2022/07/09(土)、東京開催。

DocsPluginsCLI

Capacitor Blog

Articles by the Capacitor team and community

Bypassing CORS with the Capacitor Community HTTP Plugin

This is a guest post from Tessa. Tessa enjoys drawing and eating snacks, and currently works as a developer experience engineer. She frequently speaks about Vuejs and is a host on the Enjoy The Vue podcast.

CORS, or Cross-Origin Resource Sharing, is not a popular word among developers working with front-end tech. A browser-enforced restriction mainly to protect users from a type of attack known as cross-site request forgery, CORS is more well known for the headaches it causes web developers, and that’s before we even think about mentioning mobile applications! But what if there were another way?

Thanks to the Capacitor Community, there is! The Capacitor Community is an open-source working group that builds and maintains useful tools and plugins for Ionic’s Capacitor runtime, and today we’ll be looking at how to use its HTTP plugin to sidestep CORS and smoothly make successful HTTP requests across desktop and mobile devices.

Let’s use the plugin to power an advice-a-day app to familiarize ourselves with its inner workings and API.

Sample quote from our app

What we’ll build

A Vue.js app loads and displays one cross-stitched piece of advice per day from the Advice Slip JSON API and can be deployed cross platform.

What we’ll learn

  • How to make a GET request with the HTTP plugin
  • How to get, set, and delete cookies

Prior knowledge

In order to follow along, it might be helpful to have some understanding of the following technologies:

Getting started

You can either clone the startingPoint branch or start your own project from scratch with the following steps:

  1. Create a new Ionic Vue project as per Creating a project with the Ionic CLI
  2. cd into your project and install the HTTP plugin with the following commands:
npm install @capacitor-community/http
npx cap sync

😬 Tip

If, after running both commands, you see the error Capacitor could not find the web assets directory "pathToYourRepo/dist", try running yarn build or npm build and before npx cap sync a second time.

  1. Open your project in your favorite code editor; I like to use VSCode.
  2. Optional: Download HovdenStitch, a free cross-stitch font, and move the otf file to your public/assets folder as HovdenStitchRegular.otf. Then in src/App.vue, copy and paste the below style tag at the bottom of the file to allow this custom font to be used across your app.
<style>
  @font-face {
    font-family: 'HovdenStitch';
    src: url('../public/assets/HovdenStitchRegular.otf');
  }
</style>

💡 Tip:

Although for the purposes of this tutorial CSS styles will be contained within Vue’s Single File Components for clarity, when it comes to your own projects, consider putting global styles in your src/theme folder.

Designing the order of operations

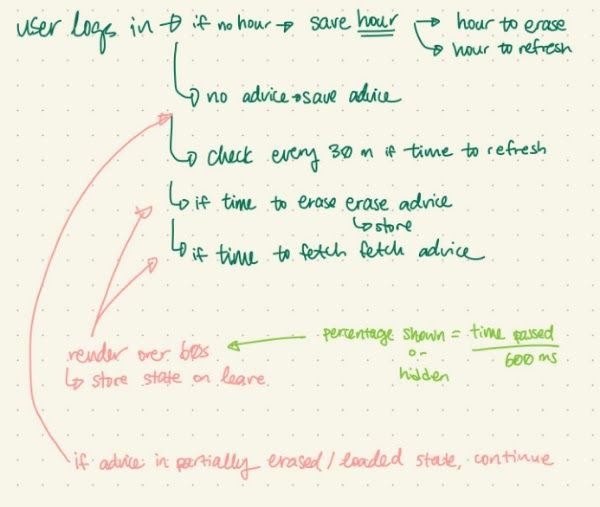
The basic idea for this app’s functionality is that it will fetch and display a max of one piece of advice per 24 hours, regardless of whether the user refreshes the page or leaves the app, and erase the current advice approximately one hour before new advice is fetched.

While this concept may seem simple on its face, it requires quite a bit of state-tracking in order to ensure the expected behavior, and therefore you might be helpful to draw or write out a rough plan for how you expect things to go as I’ve done here:

Overview of our app

Preparing HTTP helper functions

In src/views/Home.vue, replace your script tag with the below starter code:

<script>
  import { defineComponent } from 'vue';
  import { IonPage } from '@ionic/vue';

  export default defineComponent({
    name: 'Home',
    components: { IonPage },

    data: () => ({
      advice: '', // Advice currently being displayed
      animationState: '', // Dynamic class that determines whether to fade advice in or out
      hourToFetchNewAdvice: null,
      lastSaveDate: null, // The last time we fetched new Advice
      today: new Date(),
    }),

    computed: {
      currentDate() {
        return this.today.getDate();
      },

      currentHour() {
        return this.today.getHours();
      },

      hourToEraseCurrentAdvice() {
        let oneHourPrior = this.hourToFetchNewAdvice - 1;
        if (oneHourPrior < 0) oneHourPrior = 23;
        return oneHourPrior;
      },
    },

    // When we'll check if advice data needs to be changed
    async ionViewWillEnter() {
      // For more on`ionViewWillEnter`
      // see: https://ionicframework.com/docs/vue/lifecycle#guidance-for-each-lifecycle-method
    },

    methods: {},
  });
</script>

Optional: Move the script tag to be at the top of the file, above the template tag as per the Vue Style Guide. Once you get used to this pattern it can speed up your development process by reducing the scrolling between script and template and between template and style.

The first thing we’ll need to do is import our HTTP plugin by adding the following code to the top of the script tag as per the README:

import '@capacitor-community/http';
import { Plugins } from '@capacitor/core';
const { Http } = Plugins;

Now we have access to the HTTP plugin and its helper methods inside this component, so we can add the following functions to our component’s methods:

async fetchAdvice() {
  return await Http.request({
    method: 'GET',
    url: 'https://api.adviceslip.com/advice',
  })
  .then(({ data }) => {
    // Set dynamic class to fade in text
    this.animationState = 'fadeIn'
    this.resetAnimationState()

    // Save new advice
    this.advice = JSON.parse(data).slip.advice.toUpperCase()
      // In other words:
      // const dataInJs = JSON.parse(data)
      // const slip = dataInJs.slip
      // this.advice = slip.advice
      // this.advice = this.advice.toUpperCase() — // font supports upper case only

    // Update lastSaveDate
    this.lastSaveDate = this.currentDate
  })
},

updateAdvice() {
  // If 24h have passed, fetch new advice
  if(this.currentHour === this.hourToFetchNewAdvice && this.currentDate != this.lastSaveDate) this.fetchAdvice()

  // If 23 hours have passed, start fading out current advice
  else if (this.currentHour === this.hourToEraseCurrentAdvice && this.advice) {
    // Set dynamic class to fade out text
    this.animationState = 'fadeOut'
    this.resetAnimationState()

    // Clear advice from state after the fade out animation ends
    setTimeout(() => {
      this.advice = ''
    }, 10000)
  }

  // Check every 10m if it's time to fetch/erase advice
  setTimeout(this.updateAdvice, 600000)
},

// Clear animation from advice after one playthrough
// A safer approach might be to listen for `transistionend`
resetAnimationState() {
  setTimeout(() => {
    this.animationState = ''
  }, 10000)
}

The fetchAdvice method is almost identical to the GET example in the HTTP Plugin’s README, but its syntax has been reordered to fit within Vue’s methods style. The HTTP.request method allows us to make HTTP calls across different deploy targets without worrying about CORS issues. Here we’re using it to request advice from the Advice Slip JSON API’s random advice GET endpoint.

Next, we’ll want to add the following code to ionViewWillEnter to fetch advice when the page loads:

async ionViewWillEnter() {
  // If we haven't stored an hourToFetchNewAdvice before, calculate and store that and hourToEraseCurrentAdvice
  if(!this.hourToFetchNewAdvice) this.hourToFetchNewAdvice = this.currentHour

  this.updateAdvice()
},

Displaying our cross-stitched advice

Open views/Home.vue and replace the existing template with the below code:

<template>
  <IonPage>
    <div class="Home">
      <img src="yourImageHere" alt="Don't forget to add alt text!" />
      <p class="embroidery" :class="animationState">{{ advice }}</p>
      <img src="yourImageHere" alt="Don't forget to add alt text!" />
    </div>
  </IonPage>
</template>

We won’t need to mess with this too much going forward, but let’s briefly about what’s happening here:

  • This view, or page, is wrapped in the IonPage component to enable us to leverage component lifecycle hooks.
  • The Home class will be used to visually center and style advice in the viewport.
  • The img tags are placeholders for you to add personalized decorative flourishes to surround your advice; feel free to also copy the images from the base repo or remove them altogether.
  • The p tag is where we’ll render advice from the Advice Slip JSON API.
  • The v-bound animationState class enables us to dynamically fade advice in and out as necessary.

Next, replace the style tag with the following:

<style scoped>
  /* Center and style the content */
  .Home {
    background: white;
    height: 100%;
    padding: 1rem;
    display: flex;
    flex-direction: column;
    align-items: center;
    justify-content: space-between;

    /* Apply the custom font and style the text */
    font-family: 'HovdenStitch';
    font-size: 5rem;
    color: #002657;
    text-align: center;
  }

  /* Allow the flourishes to visually curve more closely around the text */
  .embroidery {
    max-width: 686px;
    position: absolute;
    top: 53%;
    transform: translateY(-75%);
  }

  /* Animate new advice being added and old advice being removed */
  .fadeIn {
    animation: fadeIn ease 10s;
  }
  .fadeOut {
    animation: fadeOut ease 10s;
  }

  @keyframes fadeIn {
    0% {
      opacity: 0;
    }
    100% {
      opacity: 1;
    }
  }
  @keyframes fadeOut {
    0% {
      opacity: 1;
    }
    100% {
      opacity: 0;
    }
  }
</style>

Now if you run yarn serve or npm serve, you should be able to see some advice in your local preview in your browser!

Persisting state

While it’s great that our advice is rendering and all, you may have noticed a small catch: we get a new piece of advice on every page load, even though our updateAdvice method is supposed to wait 24 hours before fetching new advice. This is because our state is stored only within the component, which means when the component disappears, so does our data.

To get around this, we’ll store some of our state in cookies, which can outlive the component lifecycle.

To get started, add the following helpers to the component’s methods:

async setCookie(optionsObject) {
  const cookie = await Http.setCookie({
    ...optionsObject,
    ageDays: 2,  // Set max number of days to save cookie
  })
},

This method is very similar to the setCookie example in the HTTP Plugin’s README, but its syntax has been reordered to fit within Vue’s methods style. It has also been augmented to expire any cookies after two days.

One potential point of confusion here is that when looking at the Http.setCookie source code, it may seem like this method is behaving essentially identically to the browser’s HTTP Set-Cookie approach; however, if you try to pass in a value for name or SameSite, you will quickly discover this is not so. The method’s interface reveals that this method will only take four potential pieces of data: url, key, value, and ageDays, where key becomes the cookie’s name, and ageDays its Expires value.

async deleteCookie(optionsObject) {
  return await Http.deleteCookie(optionsObject)
},

This method is similar to the deleteCookie example in the HTTP Plugin’s README, with the addition of an optional optionsObject argument which can be passed to the HTTP Plugin’s deleteCookie method. If we check out the interface for this method in the source code, we can see that it will accept either a key or a url to specify which cookie should be deleted.

async getCookie(key) {
  const allCookiesWrapper = await Http.getCookies()
  const allCookies = allCookiesWrapper.value

  for (let i = 0; i < allCookies.length; ++i) {
    const currentCookie = allCookies[i]
    if(currentCookie.key === key) return currentCookie.value
  }

  return null
},

This method is similar to the getCookies example in the HTTP Plugin’s README. However, that method will return an Array of all cookies, so if we want to get a specific one we’ll have to filter the list ourselves.

Note that forEach will not work here as the loop cannot be short-circuited by a return statement.

Now that we have access to some cookie helper methods, let’s use them.

First, add them to ionViewWillEnter:

async ionViewWillEnter() {
  // Check if there are a stored date, hour, and advice in cookies, i.e. outside component/session state
  await Promise.all([
    this.getCookie('lastSaveDate').then(lastSaveDate => this.lastSaveDate = +lastSaveDate),
    this.getCookie('hourToFetchNewAdvice').then(hourToFetchNewAdvice => this.hourToFetchNewAdvice = +hourToFetchNewAdvice),
    this.getCookie('advice').then(advice => this.advice = advice)
  ])

  if(!this.hourToFetchNewAdvice) this.hourToFetchNewAdvice = this.currentHour

  // Store the hourToFetchNewAdvice in cookies regardless so it doesn't expire
  this.setCookie({
    key: 'hourToFetchNewAdvice',
    value: this.hourToFetchNewAdvice,
  })

  this.updateAdvice()
},

Next, update fetchAdvice:

async fetchAdvice() {
  return await Http.request({
    method: 'GET',
    url: 'https://api.adviceslip.com/advice',
  })
  .then(({ data }) => {
    this.animationState = 'fadeIn'
    this.resetAnimationState()

    this.advice = JSON.parse(data).slip.advice.toUpperCase()

    // Save the advice to a cookie, too
    this.setCookie({
      key: 'advice',
      value: this.advice,
    })

    this.lastSaveDate = this.currentDate

    // Update lastSaveDate in cookies also
    this.setCookie({
      key: 'lastSaveDate',
      value: this.currentDate,
    })
  })
},

And updateAdvice:

updateAdvice() {
  if(this.currentHour === this.hourToFetchNewAdvice && this.currentDate != this.lastSaveDate) this.fetchAdvice()

  else if (this.currentHour === this.hourToEraseCurrentAdvice && this.advice) {
    this.animationState = 'fadeOut'
    this.resetAnimationState()

    setTimeout(() => {
      this.advice = ''

      // Erase the advice from cookies as well
      this.deleteCookie({ key: 'advice' })
    }, 10000)
  }

  setTimeout(this.updateAdvice, 600000)
},

Celebrate!

We did it! Now the app will fetch and erase advice once every 24 hours as designed. 🎉

Review

We covered a lot of concepts from the Capacitor Community HTTP Plugin today including:

  • How to make an HTTP GET request
  • How to save a cookie
    • Which properties of a cookie can be set with the plugin
  • How to get a specific cookie
  • How to delete a specific cookie
  • How to use the source code to answer questions not covered by the README

Next steps

What’s next in the exciting world of cross-platform Vue apps? If you’re short on ideas, here’s a few suggestions for next steps

  • Offline first: Try persisting state using another method, such as service-worker caching
  • PWA/mobile: Try deploying the app to your phone as a Progressive Web App or a native Android/iOS one
    • Note: If you opted to generate your own project for this tutorial instead of cloning from the repo, you may need to follow some additional installation steps to get the HTTP Plugin working on Android
  • Loading state: How might you save the state of the app such that if the user exits while advice is fading in or out, the transition will resume at the same spot tnext time they reopen the app?
  • Another API: There are lots of free APIs out there; how would you apply the HTTP Plugin to a new project?

🎉 Happy coding! 🎉

Continue reading ->

Announcing Capacitor 3.0 Release Candidate

Today I’m happy to announce that the release candidate for Capacitor 3.0 is finally here 🎉🎉🎉.

Not too long ago, we announced Capacitor 3.0 beta and put out a call for feedback from the community. Thanks to all your feedback and testing, we’ve reached the point where we’re ready to call Capacitor 3.0 feature complete and ready to move to RC.

If you’re curious how to migrate to Capacitor 3.0, check out the migration guide we’ve published in our docs. This is a feature packed release, and we’re excited for folks to upgrade. Some key features include:

  • Split plugins into their own packages
  • CLI run command
  • TypeScript config file
  • Autoloading of Android plugins

In addition to the Beta release post, which includes more details on these changes, we’ve also written about the plugin upgrade process here. Long story short, install the plugins you need and change your import statements

npm install @capacitor/<plugin>
// OLD
import { Plugins } from '@capacitor/core';
const { Camera } = Plugins;

// NEW
import { Camera } from '@capacitor/camera';

We’re excited to ship this release and can’t wait for you all to give us your feedback!

Cheers 🍻


Continue reading ->

Community Adoption of Capacitor

When Capacitor was first created by the Ionic team, our goal was to provide a more streamlined and modern approach to developing cross platform apps for iOS, Android, and the web. By taking advantage of modern native tooling and modern Web Platform features, we knew we could enable developers to build amazing native apps in a way that felt like web development.

At first, we intended Capacitor to be a modern tool used by the Ionic community in place of alternatives like Cordova. But more recently, we’ve started to see Capacitor grow way beyond that. In fact, Capacitor is steadily becoming the de facto choice for most web developers building native mobile apps with the web, and a default target for many other web communities outside of the Ionic ecosystem..

This is incredible and really shows how Capacitor is eclipsing even our own modest goals for the project — from popular frontend tools like Tailwind and Vue to alternative mobile UI libraries and more. Here are just a few recent examples:

Framework7

Framework7 is a mobile-ready UI library in the same vein as Ionic. Funny enough, people often compare the two and ask which one is better (as developers are want to do). But Framework7 has a dedicated and passionate community, much like Ionic has. So we were incredibly thrilled to see that with their latest V6 release, they’ve added support for using Capacitor as the native runtime of choice. This means that users of Framework7 can take advantage of all the features Capacitor provides when building native iOS and Android apps and PWAs, while using the tools that Framework7 developers are already familiar with. We’re so happy to see Framework7 adopt Capacitor and welcome them to the community.

NativeScript

In addition to Framework7, we were also thrilled to see NativeScript adopt Capacitor in the form of a plugin offering. As they note in their blog post, one of NativeScript’s features is being able to target Native APIs directly from JavaScript, so plugins can be built entirely in JavaScript. This can become quite a compelling feature if you need to integrate with an obscure 3rd party Native SDK. While still in beta, we’ve been impressed with we’ve and can’t wait to see what the community builds with it.

Quasar

For the more Vue-minded folks, Quasar has fully integrated Capacitor into their toolchain. Similar to Ionic and Framework7, Quasar UI framework for Vue provides common building blocks for building web apps. As of last year, they’ve provided full integration into the Quasar CLI so that making use of Capacitor is a natural fit for their community.

Vue

While Quasar is built on top of Vue, Vue-proper has also started suggesting Capacitor in their documentation. With this, they’re signaling to their user that “Hey, if you want to take your Vue app further, use Capacitor and target native platforms”. This is something we’ve seen the community respond well too as we hear from so many of you that you want more Vue specific content or example apps.

Tailwind

If you haven’t heard of Tailwind before, it’s a CSS toolchain for developers that makes scaffolding out common UI patterns a matter of adding a few classes to your markup. We’ve written about our experience with it and how Tailwind hit that nice sweet spot of minimalism and power-user features. Increasingly we’ve seen developers excited to use Tailwind with Capacitor and it’s no secret why. The speed at which you can develop your app’s UI and the ease of development Capacitor provides makes for a great pair. Add a bit of React, Angular, or Vue to the mix and you’re able to build some incredible features at record speed. We’re excited to see more folks in the Tailwind community look to Capacitor as their native runtime of choice.

To ze moon!

In a short amount of time, Capacitor has grown from being a tool for Ionic developers to being the de facto way to build cross platform apps across the entire web community. This Web Native approach to development is here to stay and we’re thrilled to see Capacitor leading the way.

So thanks to the folks behind Framework7, NativeScript, Vue, Quasar, Tailwind, and others for welcoming Capacitor into your own communities. If you’re interested seeing what Capacitor can do, checkout our docs. We’re excited to see what you build 🍻

Continue reading ->

Build Mobile Apps with Tailwind CSS, Next.js, Ionic Framework, and Capacitor

A very popular stack for building responsive web apps is Tailwind CSS and Next.js by Vercel.

Tailwind, a utility-first CSS framework that replaces the need to write custom class names or even any CSS at all in many cases, makes it easy to design responsive web apps through small CSS building blocks and a flexible design foundation.

Next.js, a React framework for building high performance React apps, is one of the leading environments for building production React apps on the web.

As these technologies have grown, they are increasingly used together for web app development (in fact, Next.js is working on an RFC for official Tailwind integration). This has prompted many users of these projects to ask whether they can be used to build mobile apps, too.

Turns out, they can! And they make a great fit for cross-platform mobile development when paired with Ionic Framework and Capacitor.

As I started playing with these technologies, I realized that each had a natural fit in a combined mobile stack, and I wanted to put together a solid starting foundation for others interested in building real iOS and Android apps using these technologies.

If you’re confused by all the project names and how they work together, don’t worry, I’ll break down each part of the stack each project is concerned with, along with some visuals and code samples demonstrating how all the projects work together. At the end I’ll share a starter project with these technologies installed and working together that can form the foundation of your next app.

The Stack Visualized

Diagram of layers in a Capacitor Tailwind Next.js Ionic app

The above is a live screenshot of an React app built with Next.js that is using Ionic Framework and Tailwind for the UI experience, and Capacitor to natively deploy that app to iOS and provide access to any Native APIs the app uses.

There are a lot of projects working in tandem to provide the full experience here. To visualize it, I’ve tried to overlay the different layers and how they correspond to each project in this diagram above.

We can see that Capacitor is concerned with the entire app and device layer of the app, Next.js is concerned with the entire web/React app our code and UI is running in, then Ionic handles the “platform UI” including navigation toolbar (including system title and toolbar buttons) as well as the bottom tabs.

Finally, Tailwind is used to then style and customize the content of each page, which is where the bulk of the app-specific styling will occur.

Mobile UI and Native Runtime

If your experience building with web technologies is primarily for desktop or responsive sites, you might not be familiar with mobile-focused libraries Ionic Framework and Capacitor.

Ionic Framework is a cross-platform, mobile-focused UI library for the web. It provides ~100 components that implement platform UI standards across iOS and Android. Things like toolbars, navigation/transitions, tabs, dialog windows, and more. The big draw is those components work on the web and work in frameworks like React, Angular, Vue, or plain HTML/CSS/JS.

Ionic Framework is highly popular and powers upwards of 15% of apps in the app store.

Historically, Ionic Framework would be paired with a project like Cordova which provided the native iOS and Android building and runtime capabilities. However, most new Ionic Framework apps use Capacitor for this part of the stack.

Capacitor is a project built by the team behind Ionic Framework focused on the native side of a web-focused mobile app.

Capacitor provides a plugin layer and runtime that runs web apps natively on iOS, Android, Desktop, and Web, and provides full access to device APIs and features (including extending the web environment by writing additional native Swift/Java code).

As such, any popular web technologies and libraries can be used to build mobile apps with Capacitor, and then deploy the same apps with the same code to the web and desktop.

And, to top it all off, Capacitor was just rated the second highest in satisfaction among popular Mobile & Desktop Tools on the State of JS 2020 Survey! If your last experience with this mobile development approach was with Cordova, we think you’ll find Capacitor to be a big improvement.

Introducing the Next.js + Tailwind CSS + Ionic Framework + Capacitor Starter

Now that you have a sense for how these technologies all work together to make it easy for web developers to build mobile apps, let’s take a look at a real demo and starter project (GitHub repo):

Next.js Tailwind Ionic Capacitor Starter

Let’s take a look at the main Feed page (seen above in the screenshot) for an example of how the different technologies in use work together:

import {
  IonPage,
  IonHeader,
  IonToolbar,
  IonTitle,
  IonButtons,
  IonButton,
  IonIcon,
  IonContent,
} from '@ionic/react';
import { useState } from 'react';
import { notificationsOutline } from 'ionicons/icons';
import Notifications from './Notifications';

import Card from '../ui/Card';
import { getHomeItems } from '../../store/selectors';
import Store from '../../store';

const FeedCard = ({ title, type, text, author, authorAvatar, image }) => (
  <Card className="my-4 mx-auto">
    <div>
      <img className="rounded-t-xl h-32 w-full object-cover" src={image} />
    </div>
    <div className="px-4 py-4 bg-white rounded-b-xl dark:bg-gray-900">
      <h4 className="font-bold py-0 text-s text-gray-400 dark:text-gray-500 uppercase">
        {type}
      </h4>
      <h2 className="font-bold text-2xl text-gray-800 dark:text-gray-100">
        {title}
      </h2>
      <p className="sm:text-sm text-s text-gray-500 mr-1 my-3 dark:text-gray-400">
        {text}
      </p>
      <div className="flex items-center space-x-4">
        <img src={authorAvatar} className="rounded-full w-10 h-10" />
        <h3 className="text-gray-500 dark:text-gray-200 m-l-8 text-sm font-medium">
          {author}
        </h3>
      </div>
    </div>
  </Card>
);

const Feed = () => {
  const homeItems = Store.useState(getHomeItems);
  const [showNotifications, setShowNotifications] = useState(false);

  return (
    <IonPage>
      <IonHeader>
        <IonToolbar>
          <IonTitle>Feed</IonTitle>
          <IonButtons slot="end">
            <IonButton onClick={() => setShowNotifications(true)}>
              <IonIcon icon={notificationsOutline} />
            </IonButton>
          </IonButtons>
        </IonToolbar>
      </IonHeader>
      <IonContent className="ion-padding" fullscreen>
        <IonHeader collapse="condense">
          <IonToolbar>
            <IonTitle size="large">Feed</IonTitle>
          </IonToolbar>
        </IonHeader>
        <Notifications
          open={showNotifications}
          onDidDismiss={() => setShowNotifications(false)}
        />
        {homeItems.map((i, index) => (
          <FeedCard {...i} key={index} />
        ))}
      </IonContent>
    </IonPage>
  );
};

export default Feed;

As we can see, we use Ionic Framework controls (IonPage, IonHeader, IonContent, IonToolbar, etc) for the structure of the page (these controls implement iOS and Android platform-specific styles and navigation/transition behavior), then we use Tailwind for the page content that is where our custom design lives (which will tend to be in IonContent).

If we look at another page that is just a simple list, we see that we don’t use Tailwind at all, because the user would expect this page to be a standard iOS/Android list and toggle button (code here):

Settings Page Example

So, we tend to use Tailwind more for pages with a lot of custom design and assets. That’s by design. Generally when building a native mobile app, we want to use platform conventions as much as possible, especially for experience and performance-sensitive elements like Lists, Toolbars, Tabs, and Form inputs. However, for the Feed page, which has a pretty custom UI experience, we end up getting a lot of mileage out of Tailwind.

So, in general, the way to think about when to lean more on Ionic Framework and when to lean on Tailwind is when your UI experience will heavily use typical mobile UI elements (prefer Ionic components) or when it will be more custom (prefer Tailwind).

Finally, this starter also comes with a few small opinions around folder structure and state management. For state management, the library pullstate is used which is a simple yet powerful state management library with a hooks-based API (I wrote more about it here). If want to use something else, removing it is easy.

Deploying to iOS and Android

The app can be easily deployed to iOS and Android using Capacitor and its local CLI tools. After running npm install, you’ll have the npx cap command available, which enables a native development workflow:

To add an iOS or Android native project:

npx cap add ios
npx cap add android

Then, to build the Next.js app, export it, and copy it to the native projects:

npm run build
npm run export
npx cap copy

This command is needed every time the built output changes. However, you can enable livereload during development (see the README for more info).

Then, you can launch Xcode and/or Android Studio to build and run the native project:

npx cap open ios
npx cap open android

Next steps

If you’ve been interested in building mobile apps using popular web dev projects like Next.js or Tailwind, hopefully this starter provides inspiration and a solid foundation for building your next app using web technologies. It’s worth mentioning this exact same approach can be used with other UI libraries (like material, bootstrap, or your own!).

When you’re ready, dig into the starter project, follow the Capacitor and Ionic Framework docs, and get building!

Continue reading ->

Announcing Capacitor 3.0 Beta

Today I’m thrilled to announce that Capacitor 3 is ready for public beta! The Capacitor team is looking forward to hearing feedback on it from our developer community. 💖

A New Milestone

Last year we announced Capacitor 2, which brought important platform updates to the ecosystem such as Swift 5 and AndroidX. Since then, we’ve been delighted to see massive adoption in the community. Usage has more than doubled this year alone! It’s clear that developers who use Capacitor share our commitment to staying modern and providing the very best app experiences.

For 3.0, we are focusing our attention on these areas of improvement:

  • Community involvement
  • Adaptability
  • First-class APIs
  • Developer experience and productivity

Capacitor 3 is more than just the “next version” of Capacitor. It is a crucial milestone for the project: the core team has grown significantly since the 2.0 release and now has the bandwidth and experience necessary to dedicate more time to the community, more time for prototyping and innovation, more time for stability and maintenance, and more time to deliver on Capacitor’s promise of making it easy to build web apps that run natively on iOS, Android, and the Web.

Continue reading ->

Security Advisory CVE-2020-6506

Vulnerability detail: https://nvd.nist.gov/vuln/detail/CVE-2020-6506

A universal cross-site scripting security vulnerability was discovered in Android WebView that allows cross-origin iframes or links to execute arbitrary JavaScript in the top-level document. For an attack to be successful, a user would need to navigate to a website or iframe containing malicious code within WebView. The vulnerability has been fixed in Android WebView as of version 83.0.4103.106, however users must update their Android WebView from the Google Play Store.

For users of the outdated Android WebView, Capacitor apps loading third party content in iframes or directly in the web view are only vulnerable if precautions are not taken. We are currently exploring a solution to help mitigate the vulnerability. We recommend taking the following precautions if your application may be vulnerable:

Capacitor configuration (capacitor.config.json)

The best line of defense is to only allow first-party trusted content in the web view.

  • Do not modify the server.url to a third party or untrusted website.
  • Do not add untrusted websites to server.allowNavigation.

It is recommended that apps behaving as a web browser use the Browser plugin.

HTML iframes

Care should be taken when using iframes in your application. If you need to include an iframe in your page, make sure the content is from a trusted source.

The vulnerability can be mitigated by using the sandbox attribute. Using an empty value is the most restrictive configuration that will prevent an attack.

<iframe sandbox="" src="https://example.com/risky.html"></iframe>

Caution: tokens can be added to the sandbox attribute to lift certain restrictions, however some configurations will cause an app to remain vulnerable, such as “allow-popups allow-top-navigation allow-scripts”.

Further Information

More information about the vulnerability can be found at https://bugs.chromium.org/p/chromium/issues/detail?id=1083819 and https://alesandroortiz.com/articles/uxss-android-webview-cve-2020-6506/. Many thanks to Alesandro Ortiz for bringing this to our attention.

Continue reading ->

Integrating CapacitorJS Plugins with NuxtJS

The following is a guest blog post from Dan Pastori of Server Side Up. Server Side Up is an online community that shares tutorials and resources about Vuejs, Laravel, WordPress, and more recently have started creating resources on how to deliver native apps with Capacitor.

Using CapacitorJS with NuxtJS is a perfect combination. NuxtJS allows you to develop powerful, modern fronteneds using VueJS. Combined with CapacitorJS, you can take those modern frontends, compilie them to mobile, and deploy to the platform of your choice.

Working with CapacitorJS, the power of native device features is there for you to integrate into your application. These features include GPS, Haptics, Camera, Filesystem, etc. When I structure a NuxtJS frontend, I like to design it in a way that allows me to re-use important modules through-out components, pages, and layouts.

Continue reading ->

Turn your Angular App Native

Angular is used to build seriously large applications, but did you know you can target iOS and Android (and PWA) from your codebase without many changes to your existing Angular app?

With Capacitor, any Angular app can be turned into an iOS and Android app with full access to native APIs and OS controls. Capacitor does this by providing a native runtime for web apps with a bridge to communicate from the web app to the native layer, along with many Native APIs and access to hundreds more from the community.

Perhaps a surprise to many Angular developers, Angular is already used to power a significant number of app store apps (at least 15%). This is because Ionic Framework has been widely used as a mobile UI framework for Angular since the AngularJS days and many Cordova apps used Angular over the years.

Continue reading ->

How Capacitor Works

Capacitor is a cross-platform native runtime for Web Native apps.

At a high level, that means Capacitor takes a modern web app, and then packages it up to run on iOS, Android, and PWA with access to native platform features and OS-level controls.

Capacitor then acts as the runtime facilitating communication between the web app and the underlying OS.

Let’s dig in and explore how Capacitor works under the hood.

Continue reading ->

Native React Apps Without React Native

In the React world, the primary way to build native iOS and Android apps has been React Native. Created by Facebook in 2015, React Native enables developers to use their React skills to build iOS and Android apps using platform native UI elements. React Native is popular and widely used, and it’s a great solution for many teams.

However, React Native comes with a number of tradeoffs. First, it requires developers to build in a React Native specific way, using views/JSX for each platform, and using libraries that support react-native (as opposed to most React libraries that support react-dom). But perhaps most importantly, React Native is not a web environment, so it’s not possible for teams to take their web-based React apps and libraries to deploy native apps.

The net effect is that it’s not possible to take, say, a Material-UI React web app, and deploy it natively to the Apple App Store or Google Play Store with React Native.

To do that, we need to take a look at Capacitor – a native runtime for cross-platform web apps, including any and all React web apps.

Continue reading ->

Announcing Capacitor 2.0

Today we are excited to announce Capacitor 2.0!

Capacitor 2.0 offers some key platform updates as well as security and bug fixes. These include:

  • Swift 5 and Xcode 11+ support
  • Android 10 (SDK 29) and AndroidX support
  • Bug fixes and usability improvements to 23+ core plugins
  • Support for generating splash screens and icons

We documented the whole update and talked about what’s next for Capacitor over on the Ionic blog.

Check it out:

https://ionicframework.com/blog/announcing-capacitor-2-0/

Continue reading ->

Announcing Capacitor 1.0

Today I’m thrilled to announce the 1.0 release of Capacitor, Ionic’s new Native API Container that makes it easy to build web apps that run on iOS, Android, and the web as Progressive Web Apps—with full access to native functionality on each platform.

We documented this momentous occasion over on the Ionic blog, complete with a comparison to Cordova and where Capacitor is headed from here.

Take a look: https://ionicframework.com/blog/announcing-capacitor-1-0/.

Continue reading ->

Get our newsletter

Never spam. Only the good stuff.