Deep Linking with Universal and App Links
Platforms: iOS, Android
Universal links (iOS) and App Links (Android) offer the ability to take users directly to specific content within a native app (commonly known as deep linking).
When users tap or click on a deep link, the user is sent directly into your app without routing through the device's web browser or website first. If the app isn't installed, then the user is directed to the website. If the user navigates directly to the website, they remain on the website. This makes deep links an excellent feature for cross-platform apps built for the web, iOS, and Android: a seamless mobile experience, with graceful fallback to the website.
Benefits:
- Secure: Universal/App Links use HTTPS URLs that link to a website domain that you own, ensuring that no other app can use your links.
- Seamless experience: One URL works for both your website and app, ensuring that users can successfully access the content they're looking for without errors.
- Increase Engagement: Links can be opened from email clients, search engine results, and more.
Demo Video
Here's what it looks like in practice. In this example, the user has the native app installed. They tap on app links from an email and are brought directly into the app itself. First, the root link is tapped (https://beerswift.app), which directs the user to the main app page. Next, a deep link is tapped (https://beerswift.app/tabs/tab3) bringing the user to the Tab3 page.
Prerequisites
- A pre-configured Capacitor app.
- For iOS, enrollment in the Apple Developer Program.
For illustrative purposes, https://beerswift.app will be used as the web app link.
Deep Link Routing using the Capacitor App API
When the native app is opened after a deep link is clicked, the mobile OS doesn't automatically know where to route the user. This must be implemented within the app itself using the Capacitor App API on app startup.
If your website and app paths don't match, you will need to implement more advanced url pattern matching (see this guide for examples). If your mobile app and web app use the same codebase though, this is very straightforward - just redirect to the same URL. The following examples assume this.
Angular
Routing should be implemented in app.component.ts. Start by importing NgZone and Router from Angular, then App from Capacitor:
import { Component, NgZone } from '@angular/core';
import { Router } from '@angular/router';
import { Plugins } from '@capacitor/core';
const { App } = Plugins;
Next, add Router and NgZone to the constructor:
constructor(private router: Router, private zone: NgZone) {
    this.initializeApp();
}
Last, listen for the appUrlOpen event, and redirect when a deep link is found:
initializeApp() {
    App.addListener('appUrlOpen', (data: any) => {
        this.zone.run(() => {
            // Example url: https://beerswift.app/tabs/tab2
            // slug = /tabs/tab2
            const slug = data.url.split(".app").pop();
            if (slug) {
                this.router.navigateByUrl(slug);
            }
            // If no match, do nothing - let regular routing
            // logic take over
        });
    });
}
React
There's a variety of options for React. One approach is to wrap the App API listener functionality in a new component, then add it inside of App.tsx. Start by creating AppUrlListener.tsx then import the React Router useHistory hook as well as the Capacitor App API:
import React, { useEffect } from 'react';
import { useHistory } from 'react-router-dom';
import { Plugins } from '@capacitor/core';
const { App: CapApp } = Plugins;
Next, define the AppUrlListener component, listening for the appUrlOpen event then redirecting when a deep link is found:
const AppUrlListener: React.FC<any> = () => {
  let history = useHistory();
  useEffect(() => {
    CapApp.addListener('appUrlOpen', (data: any) => {
      // Example url: https://beerswift.app/tabs/tab2
      // slug = /tabs/tab2
      const slug = data.url.split('.app').pop();
      if (slug) {
        history.push(slug);
      }
      // If no match, do nothing - let regular routing
      // logic take over
    });
  }, []);

  return null;
};

export default AppUrlListener;
Over in App.tsx, import the new component:
import AppUrlListener from './pages/AppUrlListener';
Then add it inside of IonReactRouter (or wherever your app is bootstrapped, just ensure that the History hook is available):
const App: React.FC = () => {
  return (
    <IonApp>
      <IonReactRouter>
        <AppUrlListener></AppUrlListener>
        <IonRouterOutlet>
          <Route path="/home" component={Home} exact={true} />
          <Route exact path="/" render={() => <Redirect to="/home" />} />
        </IonRouterOutlet>
      </IonReactRouter>
    </IonApp>
  );
};
Vue
VueJS offers a first party routing system that integrates natively with Vue called Vue Router. To set up deep linking with Vue Router, start in the file that you used to configure all of your routes (usually routes.js or something similar).
First we import the capacitor App from plugins along with Vue and VueRouter.
import { Plugins } from '@capacitor/core';
const { App } = Plugins;
import Vue from 'vue';
import VueRouter from 'vue-router';
Next, configure your routes using the Vue Router (more information on Getting Started with Vue Router).
const router = new VueRouter({
  routes: [],
});
It's recommended to use mode: history so you don't have to deal with the #.
Let Vue know that you are using Vue Router and register the router within Vue:
const VueApp = new Vue({
  router,
}).$mount('#app');
Finally, we need to register our app for deep linking. To do that, we add an event listener to the appUrlOpen event on the Capacitor App. Capacitor will pick this up, then we hand it off to Vue Router to navigate to the page requested.
App.addListener('appUrlOpen', function (data) {
  // Example url: https://beerswift.app/tabs/tabs2
  // slug = /tabs/tabs2
  const slug = data.url.split('.app').pop();

  // We only push to the route if there is a slug present
  if (slug) {
    router.push({
      path: slug,
    });
  }
});
Creating Site Association Files
In order for Apple and Google to permit deep links to open your app, a two-way association between your website and app must be created. One file for each must be created and placed within a .well-known folder on your website, like so: https://beerswift.app/.well-known/.
Continue on for iOS and Android configuration details.
iOS Configuration
iOS configuration involves creating a site association file and configuring the native app to recognize the app domain.
You must be enrolled in the Apple Developer Program.
Create Site Association File
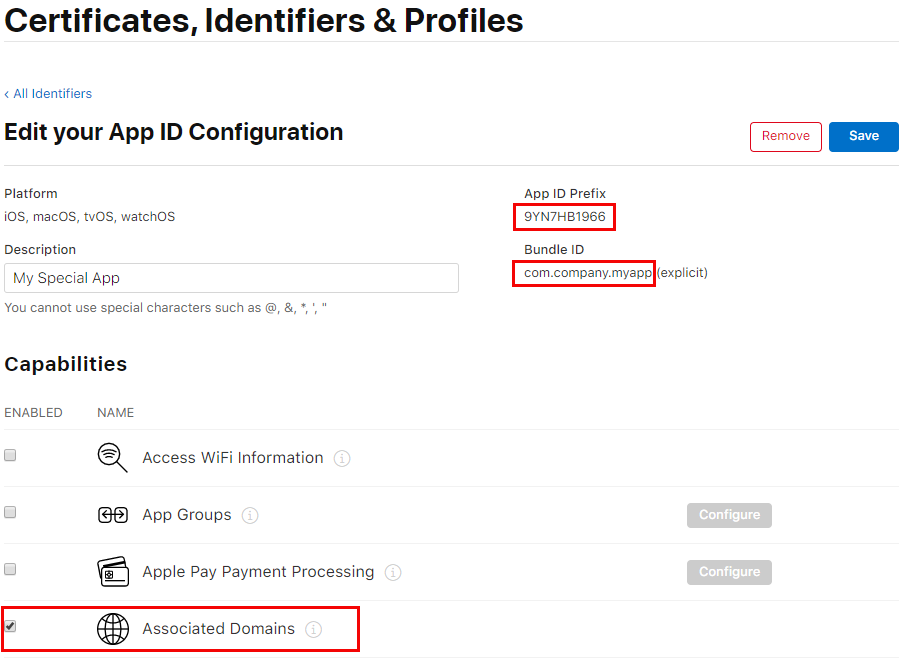
First, log into the Apple Developer site. Navigate to the "Certificates, Identifiers, & Profiles" section and select your app's identifier. Note the Team ID and Bundle ID, and under Capabilities, toggle "Associated Domains" then save:
Next, create the site association file (apple-app-site-association).
Note: Despite being a JSON file, do not save it with a file extension.
An example of the apple-app-site-association file is below. Be sure to replace TEAMID.BUNDLEID with your own IDs (example: 8L65AZE66A.com.netkosoft.beerswift).
{
  "applinks": {
    "apps": [],
    "details": [
      {
        "appID": "TEAMID.BUNDLEID",
        "paths": ["*"]
      }
    ]
  }
}
Next, upload the file to your web site (hosted on HTTPS), then validate that it's configured correctly using Apple's tool here. The URL should follow this format: https://beerswift.app/.well-known/apple-app-site-association
Add Associated Domain
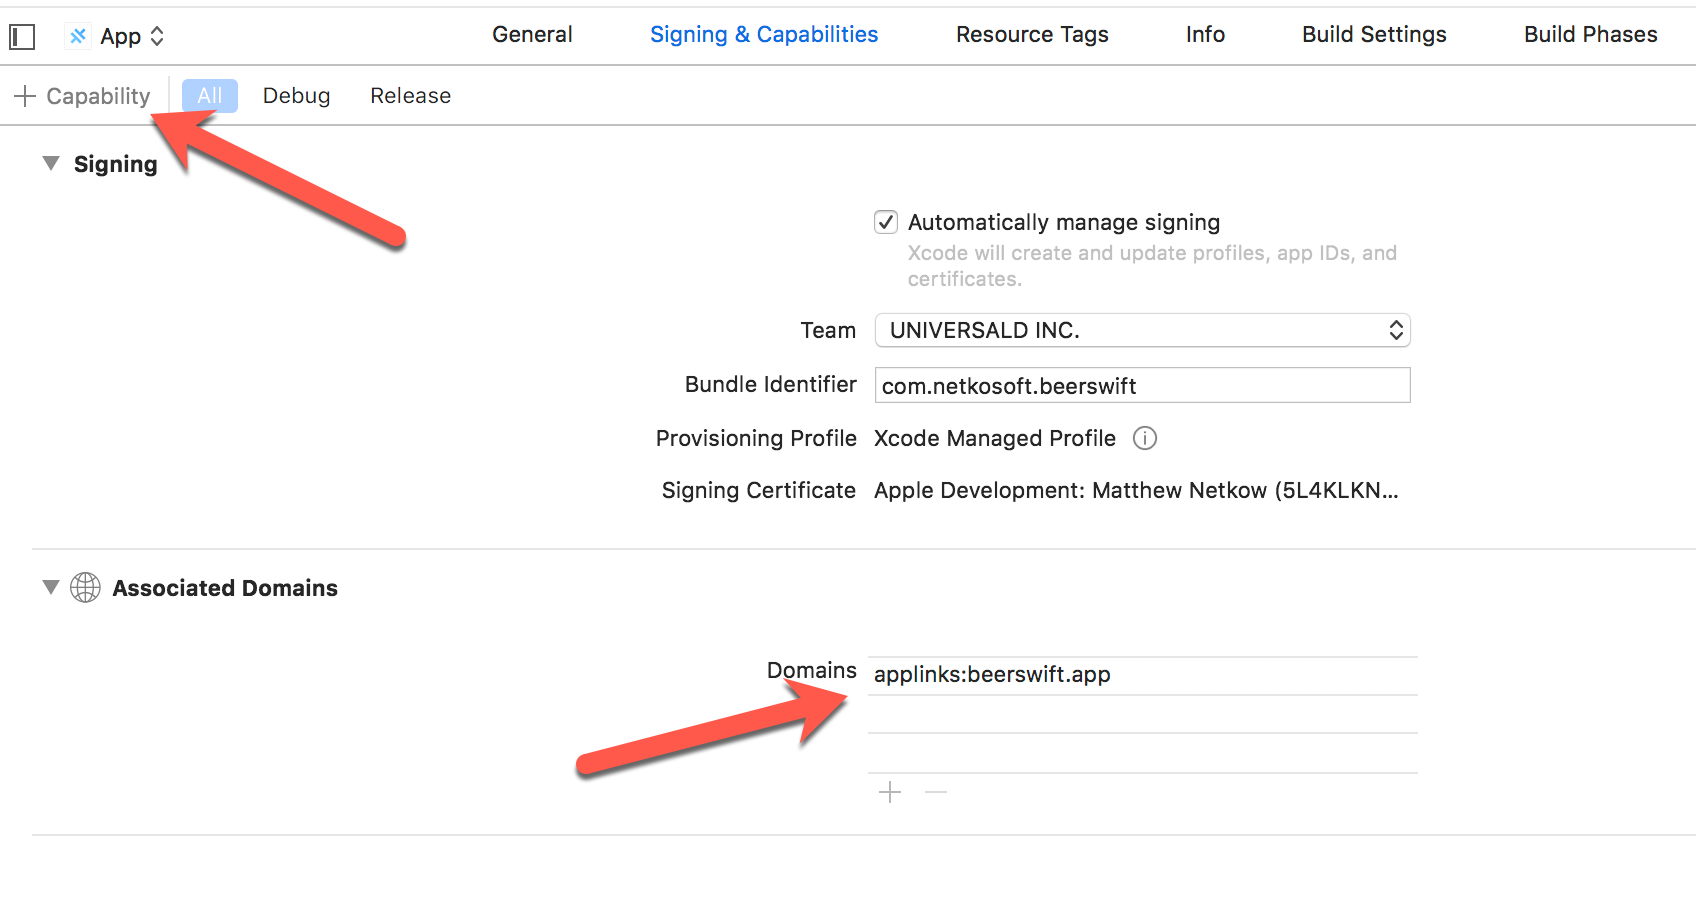
The final step is to configure the iOS app to recognize incoming links. Open Xcode, then navigate to Signing & Capabilities. Click "+ Capability", then choose Associated Domains. In the Domains entry that appears, edit it using the format applinks:yourdomain.com:
Android Configuration
Android configuration involves creating a site association file and configuring the native app to recognize app links using an intent filter.
Create Site Association File
The Site Association file requires the SHA256 fingerprint of your Android certificate.
If you have enabled automatic signing in the Google Play Store, you can get your SHA256 certificate by going to https://play.google.com/console, selecting your app, Setup, App Signing, and copying your SHA256 app signing certificate thumbprint.
If you have not signed your app or enabled automatic signing and do not already have a certificate, you can create a new certificate:
keytool -genkey -v -keystore KEY-NAME.keystore -alias ALIAS -keyalg RSA -keysize 2048 -validity 10000
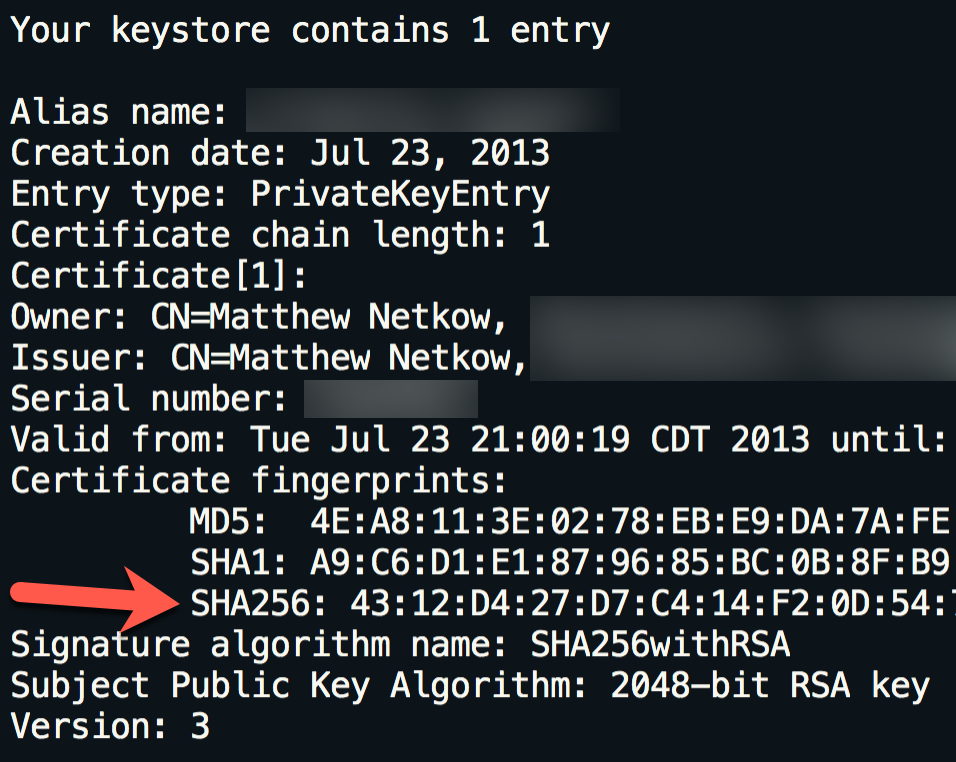
Using your existing (or newly created) Keystore certificate, use the keytool command to list the keystore's details:
keytool -list -v -keystore my-release-key.keystore
The printed output will include the SHA256 fingerprint:
Next, use Google's Asset Links tool to create the Site Association file. Fill in the website domain, app package name, and SHA256 fingerprint, then click "Generate statement":
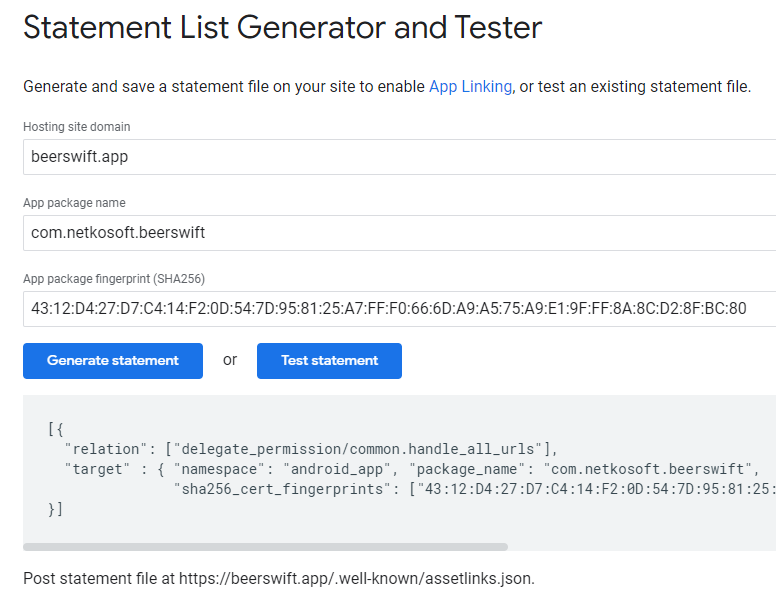
Copy the JSON output into a new local file under .well-known/assetlinks.json.
// assetlinks.json
[
  {
    "relation": ["delegate_permission/common.handle_all_urls"],
    "target": {
      "namespace": "android_app",
      "package_name": "com.netkosoft.beerswift",
      "sha256_cert_fingerprints": ["43:12:D4:27:D7:C4:14..."]
    }
  }
]
Deploy the file to your website (hosted on HTTPS), then verify it by clicking the "Test statement" button in the Asset Link tool. If it's configured correctly, a Success message will appear:
Success! Host [website] grants app deep linking to [app package].
Add Intent Filter
The final step is to configure the Android app to recognize incoming links. To do so, add a new Intent Filter to AndroidManifest.xml within the <activity> element:
<intent-filter android:autoVerify="true">
    <action android:name="android.intent.action.VIEW" />
    <category android:name="android.intent.category.DEFAULT" />
    <category android:name="android.intent.category.BROWSABLE" />
    <data android:scheme="https" android:host="beerswift.app" />
</intent-filter>
The complete Activity should look similar to this:
<activity
    android:configChanges="orientation|keyboardHidden|keyboard|screenSize|locale"
    android:name="com.netkosoft.beerswift.MainActivity"
    android:label="@string/title_activity_main"
    android:theme="@style/AppTheme.NoActionBarLaunch"
    android:launchMode="singleTask">

    <intent-filter>
        <action android:name="android.intent.action.MAIN" />
        <category android:name="android.intent.category.LAUNCHER" />
    </intent-filter>

    <intent-filter android:autoVerify="true">
        <action android:name="android.intent.action.VIEW" />
        <category android:name="android.intent.category.DEFAULT" />
        <category android:name="android.intent.category.BROWSABLE" />
        <data android:scheme="https" android:host="beerswift.app" />
    </intent-filter>
</activity>
Details: Website Configuration
Website configuration will vary based on the tools and backend used. A few suggestions are below.
Angular
Place the association files under src/.well-known. Next, configure the build process to deploy these files exactly as-is (ensuring that Apple/Google can read them correctly). Open angular.json and under architect => assets, add a new entry to the array:
{
  "glob": "**/*",
  "input": "src/.well-known",
  "output": ".well-known/"
}
Build then deploy the site.
NuxtJS
Place the association files under static/.well-known. No additional steps are necessary; simply build then deploy the site.
React
Place the association files under public/.well-known. No additional steps are necessary; simply build then deploy the site.
WordPress
See here for WordPress instructions.
Verification
To verify that the websites and the native apps are configured correctly, the website needs to host the Site Association files but the apps do not need to be in the app stores.
Connect a device to your computer, build and deploy the native apps, then test by tapping on website links. If the native app opens, all steps have been implemented correctly.
Resources
- Branch.io: What is Deep Linking?
- Android: App Links
- iOS: Universal Links
- iOS: Enabling Universal Links