Auto Filling Credentials
Android, iOS and the Web have built in password managers that will automatically detect username and password fields and securely store and recall these credentials.
In order for Apple and Google to autofill and save credentials, a two-way association between your website and app must be configured. In the guide we'll follow the same steps used for Deep Linking but we'll add steps for Capacitor Configuration and use of the autocomplete attribute.
Code Your App
Your application will need an ion-input for the username and password which must use the attribute autocomplete. An example is shown below:
- Angular
- Javascript
<form>
  <ion-list>
    <ion-item>
      <ion-label>E-Mail Address</ion-label>
      <ion-input appAutofill type="email" name="email" autocomplete="email" [(ngModel)]="email" required email></ion-input>
    </ion-item>
    <ion-item>
      <ion-label>Password</ion-label>
      <ion-input appAutofill type="password" name="password" autocomplete="current-password" required [(ngModel)]="password"></ion-input>
    </ion-item>
  </ion-list>
  <ion-button type="submit">Submit</ion-button>
</form>
Due to a webkit bug related to ion-input with automatic filling of fields you will need a workaround by copying this this directive into your code.
This sample application uses the techniques in this guide to allow auto filling of credentials on iOS, Android and the Web.
<form>
  <ion-list>
    <ion-item>
      <ion-label>E-Mail Address</ion-label>
      <ion-input type="email" name="email" autocomplete="email" required email></ion-input>
    </ion-item>
    <ion-item>
      <ion-label>Password</ion-label>
      <ion-input id="pwd" type="password" name="password" autocomplete="current-password" required></ion-input>
    </ion-item>
  </ion-list>
  <ion-button type="submit">Submit</ion-button>
</form>
Due to a webkit bug related to ion-input with automatic filling of fields you will need this workaround code:
    document.getElementById('pwd').children[0].addEventListener('change', (e) => {
      this.password = (e.target as any).value;
    });
The autocomplete attribute allows auto filling of credential types like username, current-pasword, new-password. It can also be used without this additional configuration for phone numbers, one time codes, credit card information and more.
Set Capacitor Server Hostname
By default Capacitor will serve using the domain localhost (capacitor://localhost on iOS and http://localhost on Android). As you will want the password manager to suggest the stored credentials for your app you will need to change the configuration from localhost to my-app.com (the domain you associated to your app).
You can do this in your capacitor.config.ts or capacitor.config.json file:
const config: CapacitorConfig = {
...
  server: {
    hostname: 'my-app.com',
    androidScheme: 'https',
  }
};
Configuration for iOS
Configuration in XCode
Open your project in XCode and navigate to Signing & Capabilities.
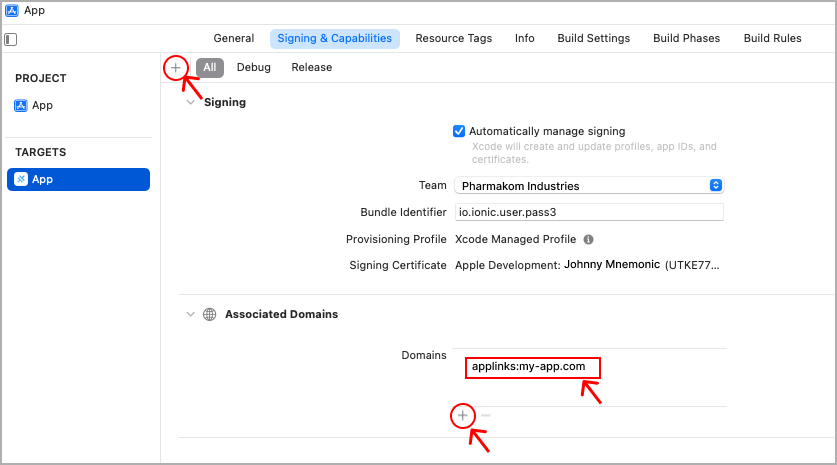
- Click the
+and add the capability ofAssociated Domains. - In the Domains section click the
+and provide an entryapplinks:my-app.comwheremy-app.comis the domain name you own and will create an App Association File for. - Make sure
Automatically manage signingis enabled (otherwise you will need to configure App Ids, Capabilities and Profiles in the Apple Developer Portal).
Apple App Site Association File
Create the site association file called apple-app-site-association similar to the one below replacing TEAMID.BUNDLEID with your own Apple Team ID and App Bundle ID (example: 8L65AZE66A.com.company.myapp).
{
  "applinks": {
    "details": [
      {
        "appID": "TEAMID.BUNDLEID",
        "paths": ["*"]
      }
    ]
  }
}
Note: Despite being a JSON file, do not save it with a file extension.
Upload the file into the .well-known folder on your web site (must be hosted on HTTPS).
The URL should follow this format: https://my-app.com/.well-known/apple-app-site-association
Validation
Validating that your app site association file is correct can be done on your iOS device.
Go to Settings > Developer > Universal Links -> Diagnostics. Enter the url (eg https://my-app.com) and a validation result will show similar to:
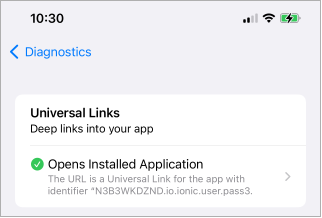
A green checkmark indicates a validation configuration whilst a yellow alert indicates a problem.
Other Validation Tools
Apple provides a tool that should validate the association. Note: It does seem to fail on good configurations.
Branch provide a tool that validates the link, content-type and JSON structure. It will show a false positive on an invalid JSON schema however.
Save Credentials
To control the saving of username and password credentials with the native iOS Password Manager you will need to use the capacitor-ios-autofill-save-password plugin:
npm install capacitor-ios-autofill-save-password
Your code will need to save credentials after successful login if it targets iOS (other platforms do not require this):
if (Capacitor.getPlatform() === 'ios') {
    await SavePassword.promptDialog({
        username: '[the username that was entered]',
        password: '[the password that was entered]'
    });
}
When the above code is called you will see the below dialog if saving new credentials or when your password is different to what was saved on the device. You will not see this dialog if your saved credentials did not change.
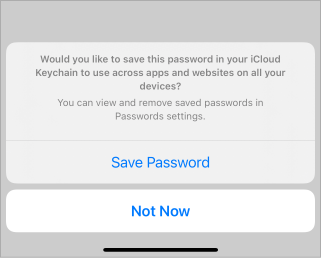
Autofill in Action
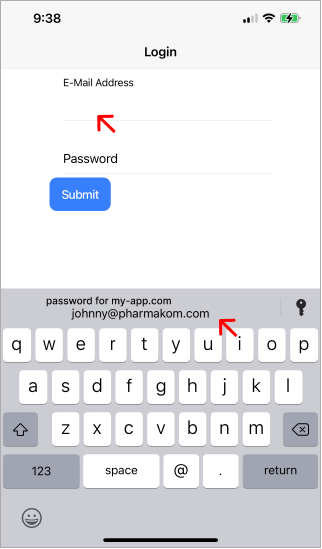
When configured correctly your application will display the below accessory bar displaying the name of the domain and username. Tapping this will autofill the credentials in the form.
If you only see a key icon and "Passwords" text then you may need to save your first credentials or your application may be misconfigured.
Configuration for Android
Follow the Android Deep Links Guide to create a Site Association File and associated AndroidManifest.xml changes and additionally verify:
- Your domain serves HTTPS with a valid trusted certificate
- Your
capacitor.config.tshas thehostnameproperty set to your domain (matchingandroid:hostinAndroidManifest.xml) and is using theandroidSchemeofhttps:
"server": {
    "androidScheme": "https",
    "hostname": "my-app.com"
}
Configuration for Web
Follow the Deep Links Guide if you are targeting the web.
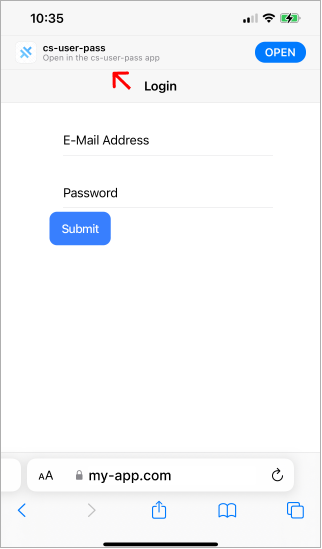
If you have your app installed on a device, when you visit your website in iOS Safari you will see a banner at the top giving the option to open the app. Consider having a separate subdomain for your application if you want to avoid this behavior.
iOS Troubleshooting
There are many ways to misconfigure an application that will cause it to not be able to save or recall credentials on iOS.
The autofill option for passwords does not appear. What should I check?
- The Capacitor Server Hostname must match the domain name of your website
- The Bundle Identifier in XCode must match the Bundle Identifier in
apple-app-site-associationfile - The Team Identifier that prefixes
AppIDinapple-app-site-associationfile must match the Team Identifier from your Apple Developer Account - The Associated Domains has a prefix of
applinks:in XCode - The Associated Domains in XCode must match the domain name of your website
- The
apple-app-site-associationfile is being served viahttpswith a trusted certificate and nothttpor a self signed certificate - The url
https://my-app.com/.well-known/apple-app-site-associationcan be displayed in a browser - The response to a request for
apple-app-site-associationis returned with acontent-typeofapplication/json - There is no file extension used with your
apple-app-site-associationfile - The
apple-app-site-associationfile was uploaded to a folder called.well-known - A redirect is not being used for
apple-app-site-association - You have saved at least one set of credentials (it cant autofill if you have never provided a username or password)
The apple-app-site-association file is checked by Apple via its CDN which will be cached for up to one week. This means that if it was misconfigured at initial check even if you correct the problem it may not work. It also means that if you change a good configuration to a misconfigured file that your app may still appear to be functional because the device has cached the association of your domain to your app.
Do I need the AutoFill Credential Provider capability?
No, this capability is not required.
Do I need the webcredentials:domain in Associated Domains?
No, you only need the applinks:domain in the Associated Domains.
Do I need the webcredentials in apple-app-site-association?
No, you only need the applinks and appID properties.
The Apple Validation Tool reports Error cannot parse app site association
Apple's tool will report an error even though your application will autofill and save credentials. Use the alternate tool by Branch to validate your Apple App Site Association file.
Apples Documentation is different from these Instructions
The documentation by Apple for associated domains shows a JSON example that includes a property called appIDs (and components) which is an array while these instructions include the property appID (and paths). At the time of this article (August 2022) and testing with iOS 15.6 this document is correct and Apple's documentation of the JSON example appears to be incorrect. This may be a bug in iOS or the documentation. Apple does have some working examples here.